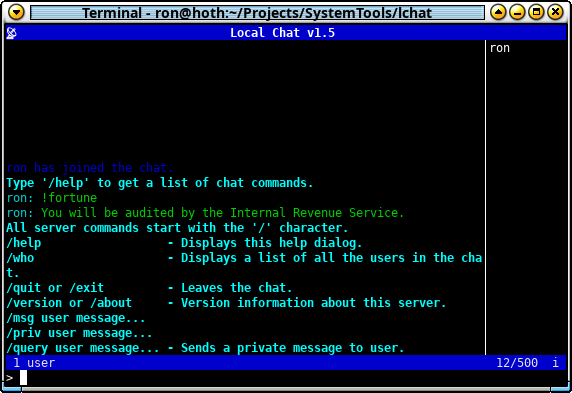
 Local chat is a very simple ‘irc-ish’ chat system over a Unix socket for a single computer/server. The target for this software is for headless servers allowing admins or other users to easily communicate on the console.
Usage
First the chat daemon needs to be started. It should be started with it’s own system user and all the users that will be using the chat system should have a common group.
To start the server as a daemon with a unix socket at /var/lib/lchat/sock for the group ‘users’.
lchatd -d -g users
lchatd -d -s /var/lib/lchat/sock -g users
To use that chat system any user in the ‘users’ group can now simply use the lchat program.
lchat
lchat -s /var/lib/lchat/sock
The Protocol
There is no real protocol involved. Basically what you type is sent exactly as is with a little bit of markup to control the message dispatching. To send a message to everyone, simple type a line and hit enter.
> Hello everybody
There are a limited set of commands that can be sent to the server. Commands start with a forward slash "/".
> /help
This will return a help message on how to use the chat system.
> /msg root I wish I had your power!
> /priv root I wish I had your power!
> /query root I wish I had your power!
These will send the private message “I wish I had your power!” to the root user.
> /version
> /about
This will return the version of the chat server.
> /who
This will return a list of all the users currently connected to the chat server.
> /exit
> /quit
This will tell the server to close the connection with the client.
When the server dispatches a message, it may add some formatting to it to indicate it’s source. Normal messages have the senders name with a colon prepended to it.
root: So much responsiblity
When the /help command is used, the messages from the server will start with a question mark "?" to indicate it as a help message.
? Type '/help' to get a list of chat commands.
Private messages are prepended with a exclamation mark "!" then the senders name with a colon. The message will be also be sent to the original sender with a caret "^" prepended to the name. This is to make the conversation consistent within the chat window.
> root: I wish I had your power
! ron: I wish I had your power
! ^root: I wish I had your power
Bots and Scripts
With in shell scripts your messages can be sent to the local chat room with the lchat client. For example you can display the systems uptime as follows:
lchat -m "$(uptime)"
Bots can be created fairly easily with shell scripts as well using the lchat client. lchat takes care of the chat room connection redirecting the standard in and out of the bot to the chat room. The bot reads its input for received chat messages and writes to its output to send messages to the chat.
lchat -b 'my_bot.sh'
Download
Current Version: 1.6.2 Source Code: lchat-1.6.2.tar.gz Git: tag 1.6.2
All Releases: lchat Releases Development: Git Repository
Installing on Debian Systems
# Download and install the public key to verify deb packages.
sudo apt-key adv --keyserver keys.openpgp.org \
  --recv-keys 7B86848C194CE861

# As root add the repository to apt.
# For Debian 9 (Stretch)
echo "deb https://apt.digitalcombine.ca/stretch stretch main" > \
  /etc/apt/sources.list.d/digitalcombine.list
# For Debian 10 (Buster)
echo "deb https://apt.digitalcombine.ca/buster buster main" > \
  /etc/apt/sources.list.d/digitalcombine.list

chmod 0644 /etc/apt/sources.list.d/digitalcombine.list

# Update apt!
sudo apt update
sudo apt install lchat
Building from Source
Requirements
- Build tools for automake and c++
- Ncurses with wide character support. It should still build without wide character support, but unicode will not be available without it.
Download the source and unpack it.
tar -xvf lchat-1.6.2.tar.gz
cd lchat-1.6.2
Next the source needs to be configured. If your on a systemd system them the configure option --with-systemd can be used to automatically manage the chat server.
./configure
./configure --with-systemd
./configure --help
Now simply use make to build and install the software.
make
make install
